Optimizing Your HDTV’s Picture

Here’s the situation: you’ve just bought a new flat-panel HDTV. You connect it to the latest Blu-ray player, power it on, and watch expectantly as its first images appear on the screen. Only, you notice the image doesn’t look right. Faces look sunburned, unnatural, and everything looks too bright. The black level you heard so much about looks much grayer than you had hoped for. That razor thin bezel aside, the image quality does not seem commensurate to your monetary outlay. You’re disappointed.
You’re also not alone.
Contrary to widespread assumption, your HDTV does not look its best out of the box. Manufacturers of flat-panel televisions do not fine-tune each display to look its best in a home environment, but rather to outperform competing displays in the showrooms. And those showroom presets don’t have the same appeal in the home, resulting in the highly unflattering imagery you see when first hitting the power button. The reality is that it’s impossible to untap your HDTV’s true potential without adjusting it from its default settings. As we will see, the difference can be quite remarkable.
Even if you’ve not paid much attention to televisions, you’re probably aware of the tricks retailers use to steer customers toward particular products and get your attention. The sets at big-box retailers are commonly configured to “torch mode” — otherwise known as “burn your retina mode” — where contrast and brightness are exaggerated in an effort to draw in the consumer. While the brightest set tends to win over the most customers, the showroom floor represents a decidedly atypical viewing scenario. Put simply, this is not the environment in which the display will be placed at home. Your HDTV will likely not have to do war with a surfeit of fluorescent lighting, and thus should not be driven with the same settings as a showroom model.
What’s wrong with factory settings?
The ultimate purpose of adjusting your television is to reproduce as closely as possible the intent of the creator of whatever content you’re viewing. What you see on your screen should closely approximate what the director, post-production engineers and visual artists at Warner Bros., Paramount, and HBO saw in their editing studio. The monitors used in post-production, for the most part, adhere to specific industry standards for color, black level, grayscale, gamma and image proportions. For example, all movies released on the DVD and Blu-ray Disc formats are originally mastered in light-controlled studios on standardized display devices. While you can’t mirror the exact displays and viewing rooms the studios use, you can adjust your television to mirror those reference standards.
Therein lies the fundamental dilemma for consumers. The default settings on consumer-grade HDTVs are usually so far removed from content standards that you are not seeing what was intended. TVs in “torch mode,” besides being way too bright for most viewing environments, exhibit washed out detail and elicit an altogether unnatural image. (This artificial nature of default settings is usually most discernible in a dark room.) What’s more, viewing an overly bright display in a dim to dark environment can lead to viewing fatigue and visual discomfort. At bottom, an unadjusted display distorts creator intent and hampers the viewing experience, and this distortion can only be reliably avoided by emulating professional practice.
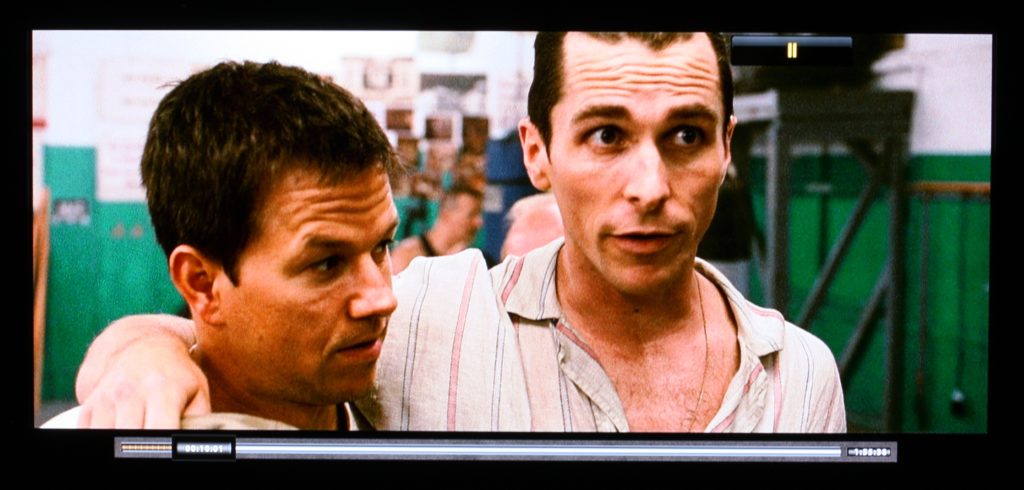
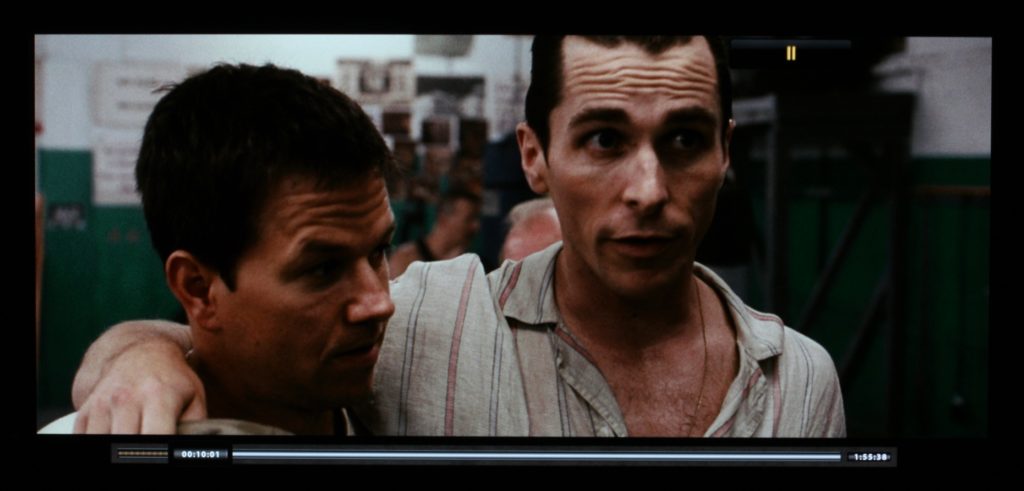
Let’s take a closer look at this disconnect between reference and consumer level reproduction. The two images below are freeze frames from the Blu-ray Disc version of The Fighter displayed on my calibrated Pioneer KRP-500M plasma monitor (ISF modes activated), which I purchased after the unfortunate demise of Pioneer’s HDTV division. The frames were captured with a Canon XSI in a light-controlled room. Due to the inevitable non-uniformity present in any imaging chain (and in particular the amount of ambient light present; again, the images are intended for dark-room viewing), you probably are not seeing the unadulterated image, but the differences should still be quite palpable. Click to enlarge.
In the images above, notice how the top image washes out white details in the background and the details on Bale’s shirt, while the calibrated image preserves those details. Also notice how the faces of our two main characters look pasty and unnatural in “torch” mode. Finally, take note of the stand behind Bale; in the top image, it exhibits a gray color, whereas the calibrated image shows its correct color of black.
What can I do about it?
Grayscale, gamma, CMS? While many of the settings in your menus can be confusing, and the rabbit hole of display calibration fairly deep, a remarkable difference in image quality can be achieved without a large investment of time and education. There are a number of approaches you can take to align your display closer to industry practice. Options range from purchasing a calibration disc, downloading test patterns via the internet, purchasing external hardware such as colorimeters and spectrophotometers, to hiring a certified calibrator to come to your home. Since the latter two can be prohibitively expensive, and using your own meters requires some advanced technical know-how, I’d recommend starting with the first two options.
Using a calibration disc or online test patterns will easily get you 85-90% of the way to industry conformity, and the learning curve is modest. With all discs and test patterns, there are a few preliminary steps you’ll want to take. Make sure the room is dark and as absent as possible of ambient light. Before you begin calibration, it’s recommended to let your display run for a minimum of 30 minutes.1 This will also allow the necessary time for your eyes to adjust to the dark environment.
The first step is to go into your settings and look for a picture mode labeled ‘Movie’, ‘Cinema’ or something similar. These presets are typically the most accurate out of the box. Some TV manufacturers (e.g., Samsung, Toshiba) will actually prompt you the first time you power on the display to choose between ‘Demo’ and ‘Home’ modes. Demo is intended for showroom floors, while Home settings will cater to the more refined lighting situations present in most living areas. This single change should immediately make your viewing experience easier on the eyes, though it won’t magically make your display 100% accurate.
Next, pop a calibration disc or thumb drive into your Blu-ray player. As with any sort of calibration activity, you need a reference to match up against, which these discs provide to enable your display to emulate industry standard. You play them just as you would a standard disc, and they typically have either on-disc or online manuals to walk you through each pattern. Like before, use your remote to adjust your TV’s settings, such as contrast, brightness, color and sharpness. A detailed explanation of these settings and other picture parameters are beyond the purview of this post, but the discs are usually accompanied by thorough explanations of what you are adjusting.
Thankfully, there are a number of quality calibration discs available today. The three mentioned below are ones I have used and recommend for their user-friendly interface and overall effectiveness.
Disney’s World of Wonder
- Most beginner-friendly
- Easy to understand tutorials of the adjustments you are making
- Includes patterns for use with and without external hardware
- Includes countless high quality clips from Disney films
Joe Kane’s Digital Video Essentials
- Average technical expertise required
- Solid background information on the hows and whys of display adjustment
- Includes patterns for use with and without external hardware
Spears & Munsil’s HD Benchmark
- Highest technical expertise required
- Highest quality test patterns
- Gorgeous intro montage
- Advanced explanations of test patterns
- Includes patterns for picture parameters than can be adjusted by eye only
To be clear, hiring a professional calibrator or getting your hands on a light meter and other hardware will be the surest path to optimal picture quality. A calibrator making use of this equipment allows for precise adjustments to things like grayscale, gamma, and CMS that cannot be reliably made by eye, getting you that much closer to seeing what Game of Thrones creators saw in the studio. But since the associated costs are often too much for the average consumer, this option is primarily intended for the enthusiast or someone who possesses the utmost desire for the accurate reproduction of movies and other program material.
A much more prudent option is adjusting the television yourself with the help of online resources and setup discs like those described above. Again, switching your display to ‘Cinema’ or ‘Movie’ mode is the first thing you should do and will get you in the ballpark of a reference image. You can also control the amount of ambient light in your viewing environment by making sure blinds are closed or getting black-out curtains.
With the drastic increase in picture quality brought about by the Blu-ray format and higher bit rate streams, user adjustment and calibration is more important than ever. The degree of detail and clarity offered by the latest flat panels and Blu-rays, when set up correctly, can deliver that “looking through a window” experience we often get at the local theater. There is often a transformative difference between an unadjusted and properly adjusted HDTV, and it’s one that few people realize until demonstrated to them. You paid hard-earned money for your HDTV: why not extract its ultimate potential?
- This step is more important for plasma panels, as this allows the phosphors to settle. [↩]


Comments